Tuesday, November 17, 2020

An update after 5 years

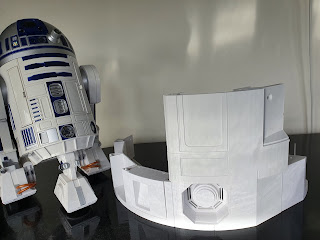
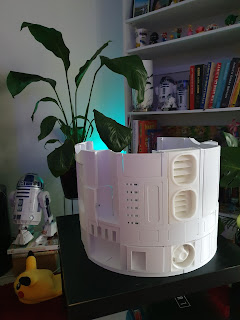
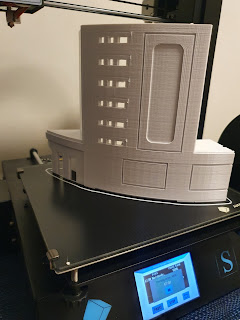
Over the last 6 months now with a 3D Printer through the pandemic I have been slowly printing part by part Michael Baddeley's MKIII R2D2 model files. A longer process than some having a smaller print base with the Anycubic Mega S using STL slicer anything is possible!

Currently I am printing the final layer of the body and hope next to move onto the legs.

Please check out Michael Baddeley's group on Facebook and Patreon.


Sunday, November 1, 2015

Star Wars BB-8 Sphero

Just purchased a new toy in anticipation for the new Star Wars VII: The Force Awaken movie. Cool little thing super fast on hard ground!

Wednesday, August 26, 2009

No Building in a While

Currently where I am living there is no space to do any R2 building, but hope to get back to it in the near future. At the moment though it is all boxed up safe and sound in storage.

Wednesday, January 14, 2009

Back again

Had a bit of time off the build with graduating and summer holidays, but am keen to getting back into the buld finishing off the dome and moving on to the body costruction.

Saturday, October 25, 2008

Drilling Holo Projectors


I have made my first cuts to the dome using a circle cutter, initially tried using it attached to a hand held drill, but the speed was eratic, thought bugger that. So using the circle cutter wound it by hand and the finished off with a dremel making pie segments and snapping them out. All three Holoprojector holes are cut and ready to sand.

Monday, October 20, 2008

Dome Marking

Today I marked off my Aluminum Dome using templates from the R2builders club printed out on A1 size paper and a ruler with holes drilled for panel sizes. Looks good made adjustment to top panels "check twice, cut once".

Friday, October 17, 2008

New Tool


I setup my new second hand drill press my second power tool next to the dremel, looking forward to making good use of it for my R2 project.

Thursday, October 16, 2008

Holiday Update

Finally get holidays for couple weeks so will hopefully have some more progress. As I'm planning to make a static droid at this case due to costs. I've worked out the wiring of sound and lights using a motion light sensor and voltage switch and a cheap cd discman. The plan is it will come on for a set duration when someone walks past playing sounds, logics and lights. Will post pictures of progress in next week or so.

Tuesday, September 30, 2008

Parts Arrived


Parts arrived for the my Dome the other day from America. I have yet to finish sanding the dome and then cut it, alot of work but I now have all the parts to get under way.

NZDamo's Paint Method


I have currently been trying different paint combinations, that are similar to krider blue.
I was able to purchase the anodized blue color for the top coat and I found an undercoat metallic purple made by plasticote which seems very similar to rustoleum which gives a nice metallic flake under the blue. I also have a glossy clear spray-paint to finish off the paint job. Check out the two images with and without the flash. I can now get around to painting my radar eye which I will post as soon as its done.

Saturday, September 20, 2008

Logic Display


I've just recently purchased a fibre optic lamp that will be used to make the front and rear logic display. This will involve using the color wheel and fibres from the lamp. Planning on following the tutorial available on the astromech.net website.

Thursday, September 18, 2008

Radar Eye Lens


Found a good lense for the radar eye today while shopping through the local hardware store it was only $2.00 for a 3inch mirror reflector check out pictures.

Tuesday, September 16, 2008

Octagon Port

Started making the octagon port using sheet styrene, found a circle cutting compass which was effective for getting diameter correct. Also painted lense for radar eye with high gloss and clear coat looks relatively good for home built job. Radar eye almost finished just puttied up waiting to sand and then paint. Will post pictures soon of progress.


Monday, September 1, 2008

Making the Radar Eye Lens

After looking at various posts on the R2Bulders club websites I decided to use the method of heating up a .40 styrene sheet then forming it over a lens shape, unfortunately I did not have a spare lens lying to use as a mould so I purchased a flood light lamp bulb that had a 3inch diameter from the local supermarket and went to work.

I still have to fill and sand a bit to get a nice clean surface but it looks alright.

Sunday, August 31, 2008

Radar Eye Creation


I started my Radar Eye using the template off Astromech.net out of 0.40 styrene. The hardest part to do as a newbie at styrene was cutting out the radar eye.
I found the best method was using a twin point ended compass and going round and round, then slicing and snapping segments out individually. I still have to do the inner wall of the lens and fill and sand the exterior but its not looking to bad for a 2 dollar job and a bit of spare time. I also still have to create the side part of the lens but this won't take to long.

Heres the link to the Radar Eye Template: "Click Here"

Thursday, August 28, 2008

Dome Top Dead Center

With my new dome the first thing to do was find top dead center of the dome so I could use this as reference when I start drawing all over it. To do this I placed the Dome upside down on a bucket and dropped a marble into it, where it stopped was top dead center, this is the easiest way in my understanding to find TDC.

Then I have started with the long process of sanding the outer dome initially using 150 grit sand paper and will slowly progress to 600.

Wednesday, August 27, 2008

Dome Arrival

The Inner & Outer Dome arrived today along with the detached bottom ring. The first thing I plan to do is find top dead center for the dome. I can then start drawing up the cutting template on the dome so I can finally try out my new dremel!! (but no hurry for that I'll try a few test cut pieces first)


Here is a concept of my planned R2D2 droid "R2DB" using photoshop.

PSI Electronics


I have solder my Front and Rear PSI's using a standard LED blinker from a local electronic store replacing the LED's with super brite LED's. I'm also planning to use the milk bottle plastic as a filter for the lights, this was my mock rig up on the right. Thinking about how I will do the front and rear logics, I'm not an electrician so am thinking about using fibre optics with a color wheel. Also the reason being I can't locate the PIC Flasher circuit in New Zealand that other builders use, bit expensive otherwise with the conversion rate.

First Part: Side Vents


These are my first parts created with sheet styrene, not bad for my first attempt. The next plan is to create the front vents and coin return.

Here is the link to the tutorial I used when making these two parts:
"Make your own side vents"

How to get in touch

Welcome to my R2D2 Project this is where I keep track of my progress on my R2D2 droid please fell free to contact me with any help for me or questions. I can be contacted through my username NZDamo at Astromech.com or the R2Builders Club.

Welcome to My R2D2 Project

This is the start of my R2D2 project, with a love of the star wars movies what greater thing to do on a rainy day in the South Island of New Zealand than build my own R2-D2 droid. Understandably this will be a challenge, I will attampt to home build a lot of my parts but will purchase some parts overseas that are above my own skill level to create.

I have joined the R2 builders club, the Austalian R2 builders club and ama keen reader of the Astromech forum.

Thank fully I found a person in New Zealand 'Bazzack' that has a few spare aluminum domes for sale at a reasonable price, I have also managed to obtain the lower ring for the dome as well. They are planned to arrive tommorrow sometime. Therefore one of my first challenges will be the cutting of the inner and outer domes, time and care will be taken and I will post pictures of my results, hopefully successful!!